Starting your own garden from scratch requires more than just a packet of seeds and some dirt. A complete seed starting supplies checklist ensures you have every tool needed to grow strong, healthy plants from day one.
Shop seed starting supplies at GroIndoor
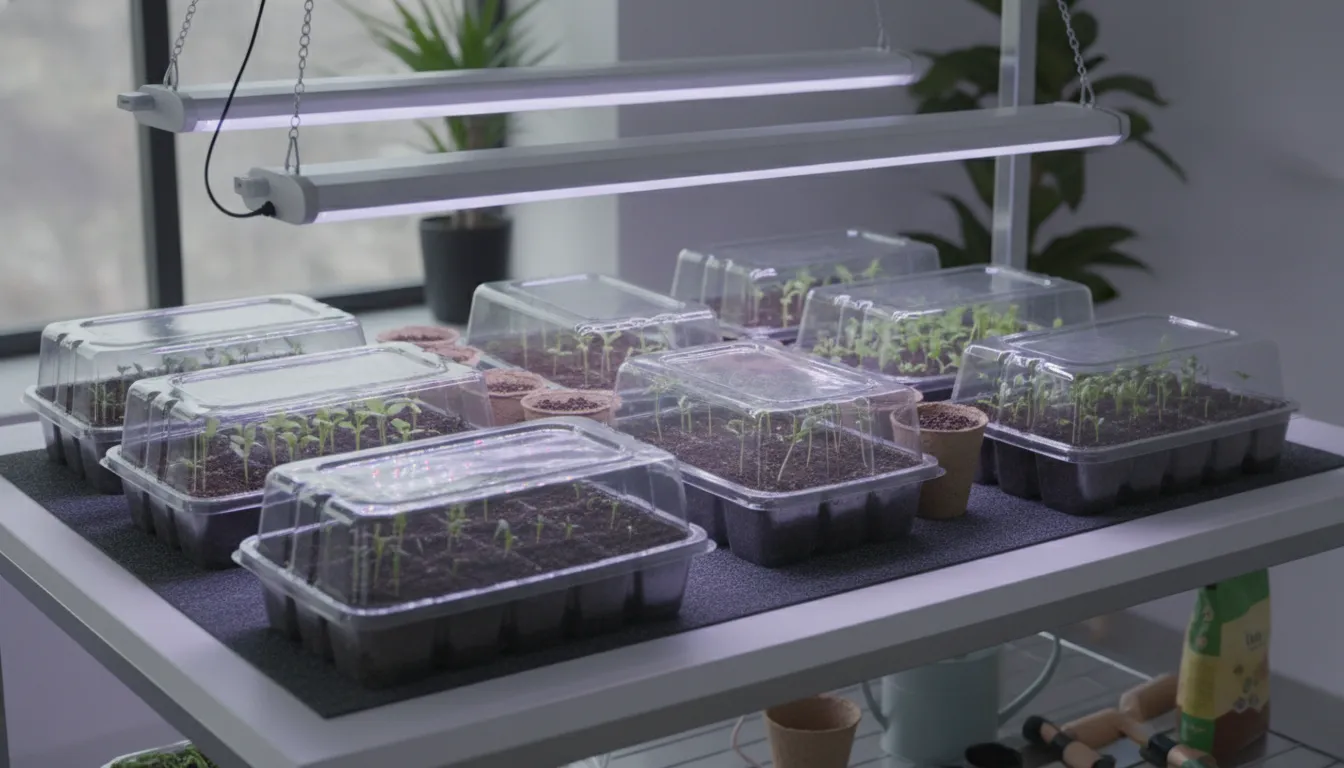
A seed starting supplies checklist should include high-quality light, sterile soil, and moisture control to ensure seeds sprout well. Essential gear includes LED lights, trays with humidity domes, and a heat mat. According to the University of Minnesota Extension, LED lights are vital for growing healthy plants because window light is often too weak. You will also need a sterile mix that allows good air flow for new roots. Once you have these items, adding labels and plant food will help you care for your crops until they are ready for the garden. Using a clear list helps you avoid mistakes that hurt your harvest.
Getting these items ready before you plant makes the whole process easier. The right tools help you avoid common problems like weak stems, uneven germination, and damaged roots. GroIndoor carries propagation essentials for every stage from sowing through transplanting.
Seed starting supplies checklist: the essentials
Starting seeds indoors is the best way to get a head start on the growing season. It lets you grow a wider variety of plants than you would find at a local store. To succeed, you need to have the right tools ready before you sow your first seed. This checklist covers the core items needed to turn small seeds into strong, healthy starts.
Trays and starter plugs
You need clean, sterile containers to house your young plants. Many growers use propagation trays because they allow you to start many seeds in a small space. These trays often come with small cells that hold individual plants, which makes transplanting easier later. Using sanitized containers is vital to prevent diseases that can kill young seedlings.
For the best results, use a sterile seed starting mix rather than garden soil. This mix should be light and airy to help roots grow. Many modern growers prefer seed starter plugs because they hold moisture well and protect tender roots. These plugs fit right into tray cells and provide a stable home for new growth.
Light and heat control
Seeds need warmth to wake up and light to grow. While some people use a windowsill, artificial grow lights are much better for producing sturdy plants. Windowsills often have cold drafts and the light is usually too weak. This causes plants to become tall and weak. Aim to keep your lights on for 12 to 16 hours every day to mimic natural daylight.
Bottom heat is also a key part of the germination process. Using seedling heat mats keeps the soil at a steady, warm temperature. This warmth tells the seeds it is time to sprout. Most warm-season crops, like peppers, should be started about 8 weeks before the last frost. Heat mats ensure these plants stay warm enough to grow quickly during those early weeks.
Comparing essential supplies
| Supply Item | Primary Purpose | Why It Is Essential |
|---|---|---|
| Grow Lights | Provide full-spectrum light | Prevents weak, leggy stems from low light. |
| Heat Mats | Warm the soil from below | Speeds up sprout times for warm-season crops. |
| Humidity Domes | Trap moisture in the air | Prevents seeds from drying out before they sprout. |
| Starter Plugs | Root growth medium | Protects roots and makes transplanting easy. |
| Seedling Trays | Organize plant starts | Allows for efficient space use and drainage. |
| Plant Labels | Identify varieties | Ensures you know which plant is which as they grow. |
Watering and nutrients
Young plants are very sensitive to how much water they get. Too much water can lead to a fungal disease called damping-off, while too little will kill the plant. It is best to water from the bottom of the tray. This keeps the leaves dry and helps reduce the risk of disease. Consistently moist soil is the goal until the seeds sprout.
Wait to add nutrients until the plant has its first set of true leaves. Adding fertilizer too early can burn the delicate new roots. When you do start, use a water-soluble fertilizer at half its normal strength. This gives the plants the food they need without overdoing it. For beginners, all-in-one seedling starter kits often include the right mix of tools and food to get started safely.
Choose trays, plugs, domes, and labels
Choose containers that balance reliable drainage, steady moisture, and enough room for healthy early root growth. The first step in your seed starting journey is picking the right home for your young plants. Your setup should help you manage water, light, and air without taking up too much space. A good seed starting supplies checklist begins with the containers that will hold your soil and seeds. These tools help you set up your garden and ensure each plant has what it needs to thrive. Using the right gear from the start makes the whole process much easier for you and your crops.
Seed trays and cell inserts
Flat trays are the base of most indoor growing setups. These trays hold water and support cell inserts, which are the small pots where you sow your seeds. You can choose from many sizes, but 10x20 inch trays are the most common choice. Using propagation trays with cell inserts allows you to grow many plants in a small area. These cells keep the roots of each plant separate, which makes it easier to move them later without causing stress.
Cleanliness is key when you pick your trays. It is best to use clean or new containers to keep your plants safe from germs. According to the University of Minnesota Extension, using cleaned containers helps stop fungal issues that can kill young seedlings. These trays also make bottom watering easy. This method lets the soil soak up water from the base of the tray. It keeps the leaves dry and helps stop the spread of plant bugs and rot.
Starter plugs and humidity domes
Once you have your trays, you must choose a starting medium. Many growers use seed starter plugs because they are clean and easy to handle. These plugs are made of peat or coco coir and provide a great air-to-water ratio for new roots. They hold their shape well and guard the roots during the transplant step. If you prefer a loose mix, ensure it is sterile and light to help the tiny roots grow fast. This mix should stay moist but not wet to avoid root rot.
Humidity domes are another vital tool for your list. These clear covers sit on top of your trays to trap moisture and warmth. Most seeds need wet and warm soil to sprout. A dome keeps the air around the seeds from drying out, which helps more of your seeds grow. Many domes have vents on top that you can open to let in fresh air. You should remove the dome as soon as you see the first green leaves appear. This change allows more air to move around the plants and keeps them from getting weak stems.
Labeling your garden
It is easy to forget which seed is in which cell once they are in the soil. Clear labels are the best way to track your plant types. You should label each row or tray as soon as you sow the seeds. Write the plant name and the date you started it on a plastic tag with a waterproof pen. This data helps you know when to feed your plants and when they are ready for the garden. Using labels stops you from mixing up different types of the same plant, like hot and sweet peppers.
Good labels also help you learn which types grow best in your home. Some plants grow fast, while others take weeks to show leaves. When you keep your trays neat, you can give each plant the right care at the right time. Proper labels save you time and keep you from guessing about your plants. A well-labeled tray ensures that your hard work leads to a great harvest. This simple step is one of the most helpful parts of your seed starting checklist.
Do you need a heat mat and humidity dome?
A key part of any seed starting supplies checklist is the grow space. While seeds can grow without extra gear, two tools make the job much easier. Heat mats and humidity domes help you control the soil and air. This leads to faster growth and healthier plants. If you want the best start for your indoor garden, these items are worth the cost.
Seedling heat mats for steady soil
Many seeds need warm soil to sprout. Warm-season plants like peppers often need soil to be between 70 and 85 degrees. Indoor air is often cooler than this, mainly in the winter. Seedling heat mats give "bottom heat" to the tray. This warms the soil directly. Warmer soil leads to faster sprouting and better root growth, as noted by the University of Minnesota Extension.
You should use a tool to control the heat with your mat. This helps you set a steady temperature. Without one, the mat might get too hot and dry out the soil. Check your soil daily to make sure it stays moist. Too much heat can kill young roots before they even start. Many starter kits with germination tools include a heat mat and a tray for this reason.
Humidity domes to keep moisture in
Seeds need steady moisture to break through their shells. If the top of the soil dries out, the seed may die. Humidity domes are clear plastic covers that sit on top of your trays. They trap water vapor and keep the air around the seeds very moist. This is helpful if your home has dry air from a heater.
Using a dome also helps with heat. It acts like a small glass house for your tray. Here are a few things to keep in mind when using a dome:
- Wipe off extra water if the dome gets too cloudy.
- Make sure the dome fits well to keep the air in.
- Check for sprouts every day so you know when to take it off.
When to remove heat and domes
Timing is everything when you use these tools. You must remove the humidity dome once most of your seeds have sprouted. If you leave it on too long, the air can get too wet. This often leads to a fungal disease called damping-off. This disease can kill a whole tray of plants in a single night. Good air flow around your plants helps them grow thick, strong stems.
You can also turn off the heat mat once the plants have their first set of true leaves. At this stage, the plants prefer air temperatures above 60 degrees. Keeping the soil too warm for too long can make the plants grow too fast. This may result in weak stems that lean. Moving your tray to a spot with good air flow and proper grow lights is the next step in your plan.
Set up grow lights for strong seedlings
Position a cool-running grow light close enough to prevent stretching, then adjust its height as seedlings grow. Natural light from a window is often too weak for young plants. Without enough light, your plants may grow thin, bent stems as they reach for the sun. This is why artificial light sources are needed to grow healthy seedlings. Using the right lights ensures your plants stay short and strong before they move to your garden.
Choose the right seedling lights
You have many choices for your indoor garden. LED grow lights are a top pick because they stay cool and use less power. You can also use fluorescent tubes, which are a common part of beginner-friendly seed starting kits. High-quality LED grow lights provide the full range of light that plants need to grow thick leaves and roots.
Set the best light height
The gap between your lights and plants matters a lot. If the light is too far away, the seedlings will stretch and become weak. You should increase the light intensity as they grow by adjusting the fixture height to keep it close to the leaves. Use adjustable chains or ropes to move the light up as your seedlings get taller.
Timing and light cycles
Seedlings need a clear day and night cycle to thrive. Your lights should stay on for 12 to 16 hours each day to give them enough energy. Using a simple timer can help you keep this schedule without any extra work. This long light period helps prevent thin stems and ensures your plants are ready for the outdoors.
Compare LED grow lights for seedlings
Plan watering and starter nutrients
Keep seed-starting mix evenly moist, not saturated, and wait to feed until seedlings have true leaves. Water and food are key for young plants. But too much of either can kill them. You must find a balance to help your seeds grow into strong starts. Using bundled seedling starter supplies is a great way to check off items on your seed starting supplies checklist.
Maintain steady moisture
Seeds need wet soil to wake up. Dry soil will stop growth and kill the seed before it starts. You should wet your trays and potting mix before you put seeds in them. This makes sure the water is spread well through the dirt. As the University of Minnesota Extension says, you should moisten the mix well before you fill your pots.
Once you sow the seeds, you must keep the air around them wet. Humidity domes are great for this job. They trap moisture so the soil does not dry out too fast. If the mix gets too dry, the seeds may not sprout at all. But you must also watch for too much wetness. Too much water can lead to a fungal disease called damping-off. This disease kills young stems and roots quickly.
The best way to water
Top watering can be hard on small plants. A heavy stream of water might wash seeds away or hurt soft stems. The best way to water is from the bottom. Place your tray in a shallow pan of water for a few minutes. The soil will soak up the water like a sponge. This keeps the leaves dry and helps prevent disease.
Good air flow also helps keep plants healthy. Moving air builds strong stems and stops mold from growing. You can use a small fan to keep the air moving in your grow space. This keeps the area fresh and helps stems grow thick. Check your soil every day with your finger. It should feel like a damp sponge, not a wet lake.
Wait for starter nutrients
Seeds have enough food inside them to start growing. You do not need to add plant food right away. In fact, adding food too soon can burn the new roots. Wait until the plant has its first set of true leaves. These are the leaves that look like the adult plant. True leaves usually grow a week or two after the plant sprouts.
When you do add food, use a light touch. Use starter nutrients that dissolve in water. Experts suggest using these at half the strength listed on the label. This keeps the young plants safe from fertilizer burn. Feeding them slowly helps them grow a big root system before they go outside.
How do you prepare seedlings for transplanting?
Prepare seedlings for transplanting by potting them up when roots need more room, then gradually hardening them off before outdoor planting. Moving your young plants to larger pots is a vital step in their early life. This process helps them develop deep, strong roots before they soon go into the outdoor garden. Having a complete seed starting kit on hand makes this task much easier for any grower. You must time the move right and handle each plant with care to keep it healthy and growing fast.
Signs your plants are ready
Your seedlings will often show clear signs when they need more room to grow. Most growers wait until the plant has grown its first set of true leaves. These are the leaves that look like the adult plant and appear after the sprout leaves. If you see roots poking out of the bottom of your propagation trays, it is time to move them. Plants that stay in small cells for too long can become root-bound very fast. This stops their growth and makes it hard for the roots to soak up food and water.
Choose the best pots
The right pots are a key part of your seed starting supplies checklist. You want new pots that give roots plenty of room to spread out and grow thick. Many home growers use plastic pots or small cups that have drainage holes in the bottom. These holes let extra water flow out so the roots do not sit in mud and rot. Some plants do not like having their roots moved at all. For these touchy types, like melons or cucumbers, use pots made of peat or paper. These pots go right into the ground with the plant to keep the roots safe.
Steps to pot up
Follow these five steps to move your seedlings into their new homes without too much stress.
- Water your seedlings well about one hour before you plan to move them. Damp soil sticks to the roots much better and protects them from the dry air.
- Fill your new, larger pots with fresh potting mix and leave a small hole in the center. The hole should be deep enough to hold the plant at the same level it grew before.
- Turn the old tray over and tap the bottom gently to loosen the plant and soil. Never pull a seedling out by its thin stem, as this can snap the plant in half.
- Lift the plant by the root ball or a sturdy leaf and place it into the new hole. Firm the soil around the base with your fingers to remove any large air pockets.
- Give the new pots a light watering right away to help settle the roots. Keep them in a shady spot for a full day before putting them back under your grow lights.
Wait for the plants to show new growth before you start to add any liquid food. Using half-strength plant food helps the new roots adjust without getting burned by salts. You should also check the soil temperature to keep it warm and steady. Moving your plants slowly to outdoor light also helps them get ready for the wind and sun. This step is called hardening off and it prevents the leaves from getting scorched. Taking the time to prep your plants now leads to a better harvest later in the year.
Troubleshoot your indoor seed starting setup
Most seedling problems point to an imbalance in light, moisture, warmth, or airflow. Troubleshooting your setup is easier when you have the right tools. Using a seed starting supplies checklist ensures you have the lights, trays, and fans needed to keep plants healthy. If your young plants look stressed, you can often fix the issue by adjusting your gear and grow space.
Leggy growth and weak stems
Long, thin stems often mean your plants are not getting enough light. If seedlings stretch toward a window, they become weak and may fall over. Windowsills are usually poor spots for growth because they get too hot during the day and too cold at night. To fix this, use artificial grow lights and keep them just 2 to 3 inches above the tops of your plants. This close distance forces the seedlings to stay short and strong.
If you already have leggy plants, you can try to save them by moving your lights closer right away. For some plants like tomatoes, you can bury the stem deeper when you move them to larger pots. But the best path is to stop stretching from the start. A complete seed starting kit with built-in light stands can help you keep the right height as your garden grows. According to the University of Minnesota Extension, artificial light is vital for growing healthy, sturdy seedlings.
Damping off and root rot
Damping off is a common fungal disease that causes young stems to fall over at the soil line. It usually happens when the soil stays too wet or the air is too still. To stop this, use a sterile, soil-less seed starting mix instead of old garden soil. Make sure your propagation trays have good drainage holes so water does not sit at the bottom.
You can also boost air flow by placing a small fan near your setup. A light breeze strengthens the stems and dries the soil surface. This helps prevent mold and rot. Avoid overwatering; the top of the mix should feel slightly dry before you add more water. If you see fuzzy white growth on the soil, boost the air flow and water less often. Keeping your tools clean is also a key part of indoor grow room maintenance.
Slow growth and yellow leaves
If your seeds are slow to sprout, the soil might be too cold. Most seeds need warmth to wake up. Using seedling heat mats can keep the soil at a steady heat, which speeds up growth. Once the plants grow their first true leaves, they may need light feeding. Yellow leaves often show that the plant has used up the food in the seed and needs a weak liquid plant food.
Stunted growth can also come from crowded roots. If you planted many seeds in one spot, you must thin them out. Use scissors to snip the smaller plants at the soil level. This ensures you do not hurt the roots of the strongest one. This gives the remaining plant enough space and food to thrive. If growth stays slow even with heat and food, check for cold drafts. Most warm-season crops grow best when the air stays above 60 degrees.
Browse propagation trays, domes, plugs, and heat mats
Frequently Asked Questions
Do I need special lights to start seeds indoors?
You often need special lights to grow healthy plants inside. Windowsills mostly do not give enough sun, which makes plants weak and thin. Using LED grow lights helps your seedlings grow strong and sturdy. Keep the lights close to the plants to give them the best care. This makes sure they get all the light they need to stay healthy.
What kind of soil should I use for seed starting?
You should use a light, fluffy seed starting mix instead of garden soil. Garden soil is often too heavy and may have bugs or diseases that harm young plants. A good mix helps water drain well while keeping the roots moist. You can buy these mixes at a store or get them in a complete seed starting kit online. It is a simple way to help your garden grow.
Do I need a heat mat for starting seeds?
A heat mat is very helpful for many warm plants like peppers and tomatoes. These mats keep the soil at a steady heat level which helps seeds sprout much faster. According to the University of Minnesota, bottom heat is a great way to support early plant growth. It is an easy tool to use for any indoor garden setup at home.
When should I start seeds indoors?
Most gardeners should start their seeds about eight weeks before the last frost date in their area. This gives the plants enough time to grow large and strong before they move outside. Experts at Clemson University say that warm crops like peppers need four to eight weeks of indoor growth. Checking your local frost dates helps you plan the best time to start.
Ready to build your seed starting kit?
Prepare your trays, lighting, warmth, and transplant containers before sowing. A complete setup makes moisture and temperature easier to manage from germination through transplanting.
Tags: